Start Using Getfox API
Integrate Across Social Media Channels
Learn how to integrate Getfox with your app for NFT minting and more
Overview
API Query Language
The Getfox service supports GraphQL based interaction with our API services.
Available APIs
The following APIs are available:
| Name | Description |
|---|---|
| Users API | Create, modify and read Getfox users. |
| Links API | Create, modify and read folders, URL, resource, shop and NFT links. |
API Endpoint
The endpoint location
https://getfox.io/graphql/
Roles and rate limits
Your request rate limit may vary depending on your role in the system.
| Role | Rate limit |
|---|---|
| Basic | 15k requests/day |
| Advanced | 50k requests/day |
| Business | 150k requests/day |
The
Basicrole is given by default.
Getting started
Before you start making API calls from your application you’ll have to:
- Create an account in the
Getfoxapplication - Retrieve your API key.
Your username and API key are required to created authentication tokens, that authorize your API requests.
Create account
This section will show you how to setup your
Getfoxaccount.
Sign up with Getfox.
-
Open the
https://getfox.io/signuppage. -
Enter your credentials
UsernameYour account name. It’s a unique name that you’ll be indentified in the system.E-mailYour email.PasswordYour password. -
Check the privacy policy agreement.
-
Click the
Create Free Accountto create an account.
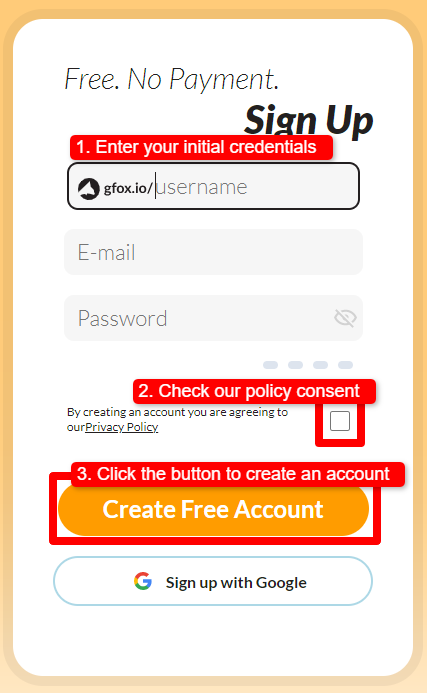
Figure: Sign up with Getfox
Next, you have to activate your account. You’ll receive a email with an verification link.
Check your mailbox and look for the Activate Your Getfox Account email.
Click the link from the email to complete the sign up process.
https://getfox.io/activation/<activation-code>
You’ll be redirected to the Login page where you can login into your account.
Sign up with Google.
In this scenarion your account will be authorized by Google service.
-
Open the
https://getfox.io/signuppage. -
Click the
Sign up with Googlebutton to create an account.

Figure: Sign up with Google
You’ll be redirected to confirm your email in the Google authorization window.
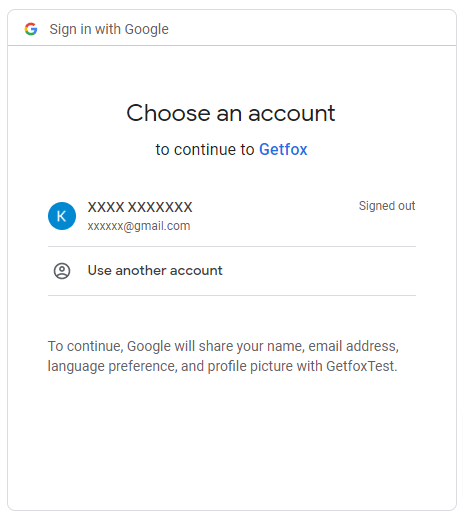
Figure: Sign in with Google
Once you authorize with your Google account your account is active and you can log in.
Login to Getfox
Open the https://getfox.io/login page.
Login with Getfox
Enter your email and password and click the Log in button.
Sign in with Google
If you created your account with Google verification, click the Sign in with Google button.
After the login procces is complete, you’ll see the dashboard page.
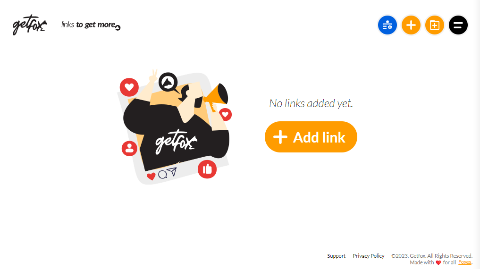
Figure: Dashboard
Get your API key
Go to the Profile page.
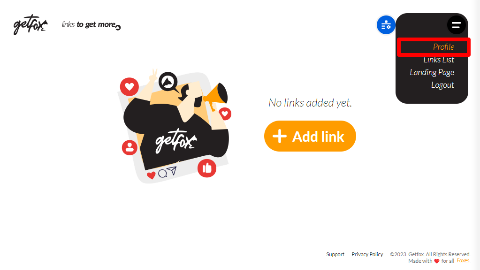
Figure: Open profile page from menu
Grab your personal API key from the Profile page.
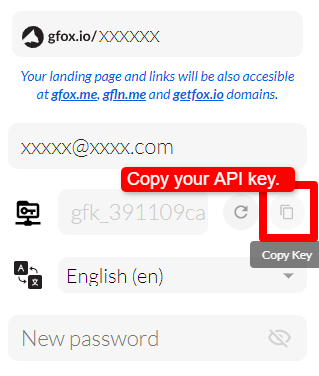
Figure: API key
This key will be used to authenticateauthorize your API requests.
API Reference
This section will outline how to integrate the Getfox API in your application. For full API methods list go here.
Status and error responses
Mutation responses contain success and message values.
If success value is true, it means the operation is successful, otherwise it failed.
The message message contains detailed information about operation.
Sample: Mutation with success and message return fields
mutation {
      updateUser(
            userInput: {
            id: 111, // user ID not associated with any existing user
            username: "xxxxx" // new username
          },
            token: "eyJhbGciO(...)", // your authentication token
          ) {
        user {
          id
        }
        success
        message
      }
    }
Create authentication token
Having
- your username (eg.
johnsmith) - API key (eg.
gfk_xxxxxxx)
you’re able to create calls to Getfox API endpoint.
All Getfox API queries and mutations require a valid access token.
Request session token
mutation {
      authenticate(username: "xxxx", apiKey: "gfk_eaxxxxx") {
        token
      }
    }
You should receive a response
{
      "data": {
        "authenticate": {
          "token": "eyJhbGciO(...)"
        }
      }
    }
Having the token string you’re good to make API calls.
An authentication token will expire after 1 hour. After this time you can refresh the token or create a new one.
Users
Users API provides functionality for creating, modifying and reading users.
Sample: reading user
query {
      user(
          userInput: {
            email: "xxxxxxxx@genb.com",
          },
            token: "eyJhbGciO(...)", // your authentication token
        ) {
        id
        username
        email
        language
        contactDetails {
          firstName
          lastName
        }
      }
    }
The response should be as follows:
{
      "data": {
        "user": {
          "id": "1",
          "username": "xxxxxx",
          "email": "xxxxxx@xxxx.com",
          "language": "en",
          "contactDetails": {
            "firstName": "xxxx",
            "lastName": "xxxxxxxx"
          }
        }
      }
    }
Links
Folders
Folders are groups of links.
They can be created in dashboard
Sample: Creating a folder in dashbord
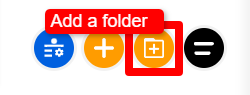
Figure: Add Folder
Sample: Creating a folder in API
  createFolder(
        token: "eyJhbGciO(...)", // your authentication token
        linkInput: {
          name: "xxxxx", // folder name
        }
      ) {
        link {
          id
          name
        }
        success
        message
      }
You can associate links with folders using the addLinkToFolder mutation.
addLinkToFolder(
        linkInput: {
          folderId: 12, // ID of your folder
          linkId: 36, // ID of your link
        },
        token: "eyJhbGciO(...)", // your authentication token
      ) {
        success
        message
    }
URL link
URL links are pages with references to external URL address of your choice.
Sample: Create URL link
  createFolder(
        token: "eyJhbGciO(...)", // your authentication token
        linkInput: {
          name: "xxxxx", // folder name
        }
      ) {
        link {
          id
          name
        }
        success
        message
      }
Resource links
Resource links are pages with file assets.
Sample: Create resource link
  createResourceLink(
    token: "eyJhbGciO(...)", // your authentication token
    linkInput: {
      name: "xxxxx", // folder name
      resourceUrl: "https://xxxx.jpeg", // asset URL that will be associated as NFT image; asset hosted with IPFS service
      backgroundUrl: "https://xxxx.png",
    }
      )
      {
        link {
          id
          name
          linkUrl
          thumbnail
          resource
        }
        success
        message
      }
    }
Shop Links
Shop links are pages where you can sell your products.
Shop links requires connecting to a Stripe account. You can make it in the Profile view or directly in the link view.
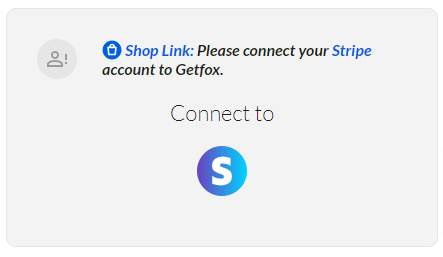
Figure: Connect Stripe account
The transaction process can be outlined as follows:
- Getfox user creates a shop link.
- Buyer pays for the NFT with
Stripepayment process. - Buyers get an information about his order.
Create shop link with API
You can create
Shop linkonly when yourGetfoxaccount is connected withStripeservice.
Sample: Create shop link
  createShopLink(
          token: "eyJhbGciO(...)", // your authentication token
        linkInput: {
          name: "xxxxxxxxx",
          price:"8.00",
          currency:"USD",
          description: "xxxxxxxxx",
          productImage1Url: "https://xxxx/xxxxx.png",
          allowedCountries: ["us"],
          freeShipment: true,
          paidShipment:true,
          freeDeliveryDays: 2,
          paidDeliveryDays: 1,
          deliveryPrice: "4.95",
          deliveryCurrency: "PLN"
        }
      )
      {
        link {
          id
          name
          linkUrl
          thumbnail
        }
        product {
          price
          currency
          quantity
          productImage1
        }
        success
        message
      }
Sell product with product’s front page
Once the Shop link is created, your customers can access your product with the front link page.
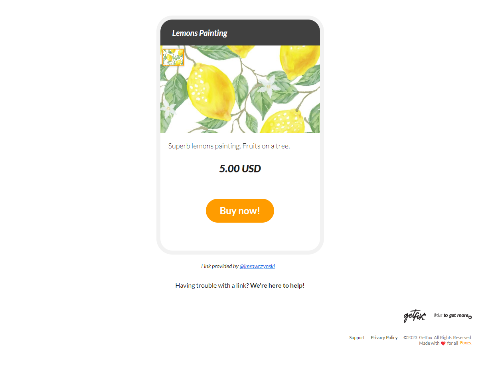
Clicking the Buy Now! button will take your customer to the Stripe payment checkout page.
Figure: Front product page
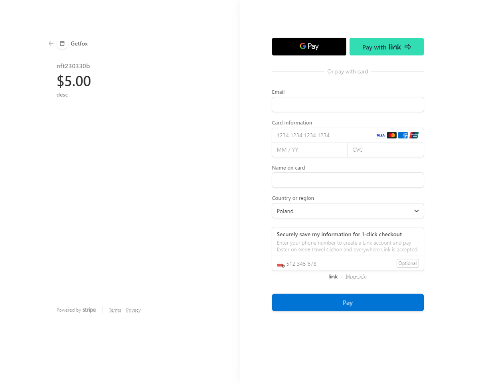
Figure: Stripe payment
After the payment is complete in the Stripe checkout window, the customer is redirected back to the product’s front page. The transaction is complete and customer can track his order status in the Getfox application.
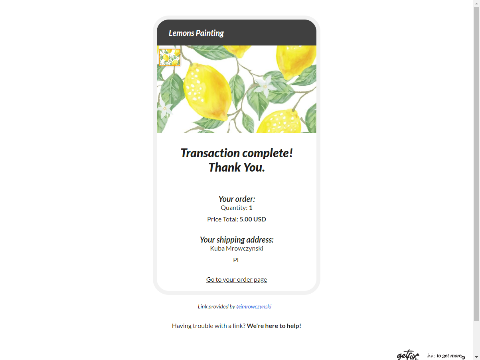
Figure: Transaction complete page
Now the customer can view his order by clicking the Go to your order page link.
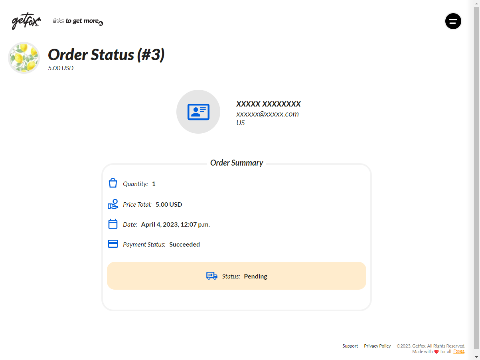
Figure: Order status page
NFT links
NFT links are pages where you can sell your NFT tokens.
With Getfox, you can create NFT token based on your digital asset, and publish a page where you trade it.
Digital assets that you provide to tie with NFT token are hosted with IPFS server. The server is hosted within the Getfox infrastructure.
Currently, the only supported chain is Ethereum.
NFT tokens are processed in the Getfox smart contract and have no interaction with any external services.
NFT Promise
When you create NFT link, you doesn’t actually mint a token, but you create a free-of-charge NFT Promise that will help maintain the token transaction.
NFT Promise is a smart contract signature exclusively connected with given NFT Token. Creating promise is free of charge.
When you create NFT Link:
- it doesn’t charge you any costs
- you doesn’t mint the token, thus doesn’t pay for it
- you create a
NFT tokensignature, and buyer mints the token itself after transfer process is done
NFT Tokenis anERC1155token created on smart contract owned by Getfox.NFT linksare pages where you trade your NFT tokens.
The NFT transaction process can be outlined as follows:
- Getfox user creates a NFT link. It may choose to:
- create
NFT Promise- mint costs will be covered by buyer. - mint this
NFTtoken - mint costs will be covered by link publisher (available only for API)
- create
To mint
NFT tokenwith API usecreateNftLinkand setmintproperty toTrue. This will mint token and charge the publisher with all the gas costs.
- Buyer pays for the NFT with:
- Web3 payment process. Buyer pays with cryptocurrency.
Stripepayment process. Buyer pays with traditional currency.
- The NFT is being transfered to buyer’s web3 wallet address and the NFT link is resolved as sold.
- The NFT token can be resold by a new owner (with a new NFT link, but the same NFT token).
If you sell your NFT with traditional currency, it’s required to connect to Stripe account.
Sample: Create NFT link with API request
  createNftLink(
          token: "eyJhbGciO(...)", // your authentication token
        linkInput: {
          name: "xxxxxxx", // the NFT link name (also, NFT name)
          paymentMethod:"traditional", // traditional payment (no crypto)
          price:"10.00",
          currency:"PLN",
          description: "link_230120 desc",
          mint: false, // create NFT promise or mint a token
          resourceUrl: "https://xxxx.jpeg", // asset URL that will be associated as NFT image; asset hosted with IPFS service
          backgroundUrl: "https://xxxx.png",
          web3Address:"0x0000000000000000000000000000" // your web3 wallet address
        }) {
        link {
          id
          name
          linkUrl
          background
          thumbnail
        }
        product {
          price
          currency
          cryptoPrice
          cryptoCurrency
          payWithFiat
          payWithCrypto
        }
        nftToken {
          id
          name
          description
          nftTokenId
          ipfsHash
          ownerAddress
          metadataHash
          chainId
        }
        success
        message
      }
This will:
- create NFT token promise. It will be minted and transfered to buyer’s web3 wallet after payment process is done.
- create NFT link where the NFT token promise is referenced
- create product in the
Stripeservice
Sell NFT token
The link from linkUrl is the public address of this NFT link. Users that are connected to web3 wallet are eligible to buy the NFT from this page.
Sell NFT token with Stripe
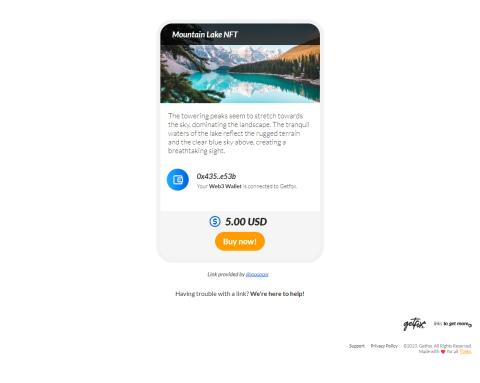
Figure: NFT link page
Clicking Buy Now! will redirect your customer to the Stripe payment checkout page.
Figure: Stripe payment
When customer confirms his payment in the Stripe service, system updates information about NFT ownership.
After the payment is complete in the Stripe checkout window, the customer is redirected back to the NFT link page. He’ll be asked to mint and transfer the NFT token with the Metamask wallet.
Sell NFT token with cryptocurrency
Clicking Buy with Crypto! will open Metamask to confirm the payment.
After buyer confirm his crypto payment, system updates information about NFT ownership. He’ll be ask to mint and transfer the token to his web3 wallet address.